 Pin it
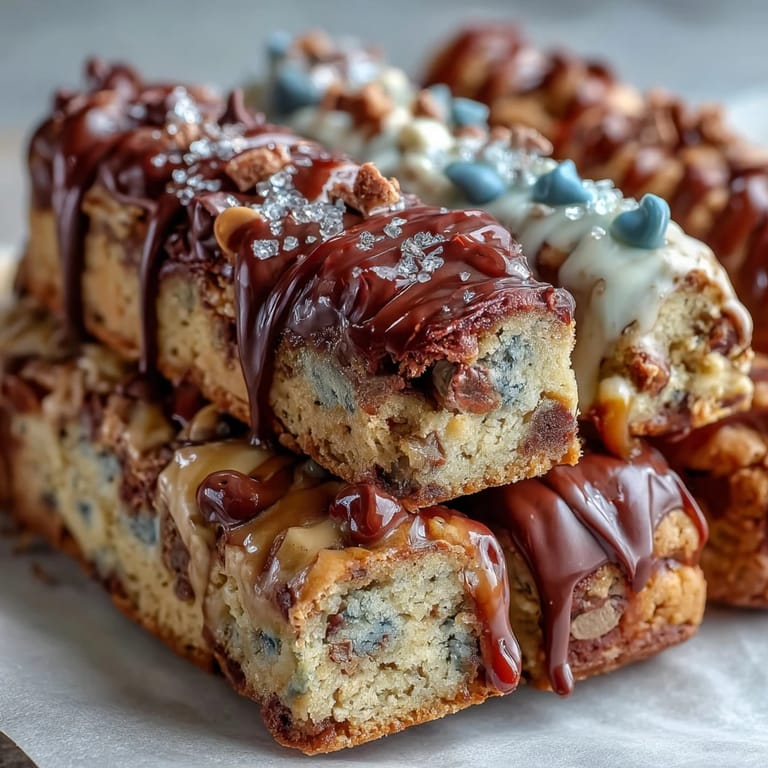
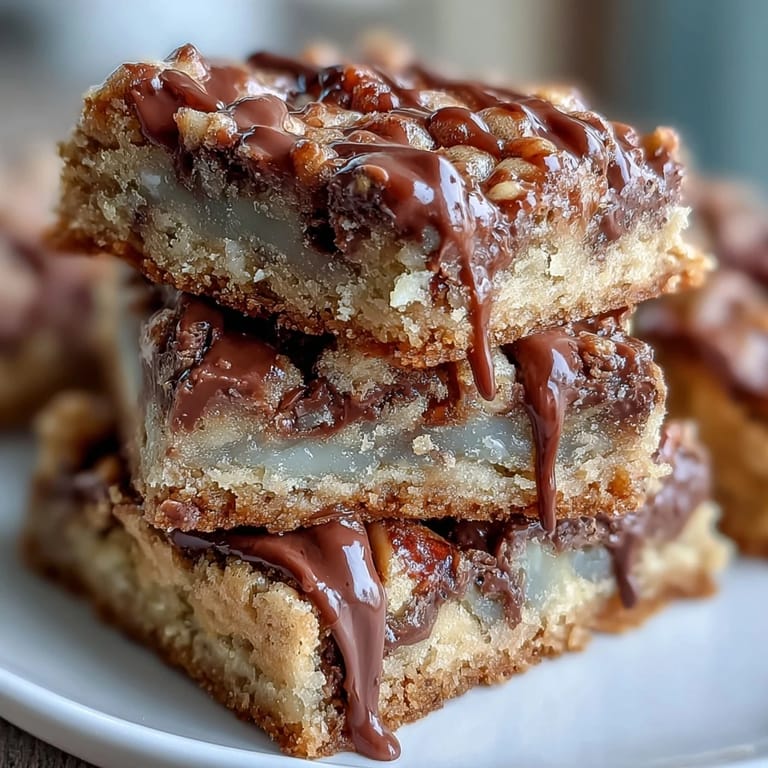
 My nephew called me three weeks before graduation, voice trembling with excitement, asking if I could bring something special to his party. I found myself standing in my kitchen at midnight, suddenly inspired by the memory of sneaking warm brownies from a cooling rack at my own graduation celebration decades ago. These cookie bars felt like the perfect bridge between childhood indulgence and grown-up achievement—chewy, studded with chocolate, and customizable enough to wear his school colors like a badge of honor. What started as a late-night Pinterest scroll turned into something I made twice more before the actual party, each batch teaching me something new about timing and texture.
I'll never forget setting these bars out at my nephew's graduation party and watching his best friend take a bite, eyes widening as they bit through that white chocolate drizzle. His reaction told me everything—these weren't just dessert, they were edible proof that someone had taken time to make something special. The bars disappeared faster than the champagne toasts, and three different parents asked for the recipe before the sun set.
Ingredients
- All-purpose flour (2 1/4 cups): The foundation that gives these bars structure without being dense; too much mixing here is your enemy, so fold gently like you're being respectful of its delicate job.
- Baking soda (1 tsp): Just enough to help everything rise slightly and spread in the most satisfying way, creating those perfectly chewy edges.
- Salt (1/2 tsp): Your secret weapon that makes every flavor pop louder; never skip this because it's what prevents these from tasting one-dimensional.
- Unsalted butter, melted and cooled (1 cup): The richness that makes people close their eyes when they bite into these; cooling it slightly prevents cooking the eggs, which is crucial.
- Brown sugar (1 cup packed) and granulated sugar (1/2 cup): This combination creates depth and chewiness; the brown sugar brings molasses notes that white sugar alone could never achieve.
- Eggs (2 large) and vanilla extract (2 tsp): These bind everything together while adding moisture that keeps these bars tender even after days in storage.
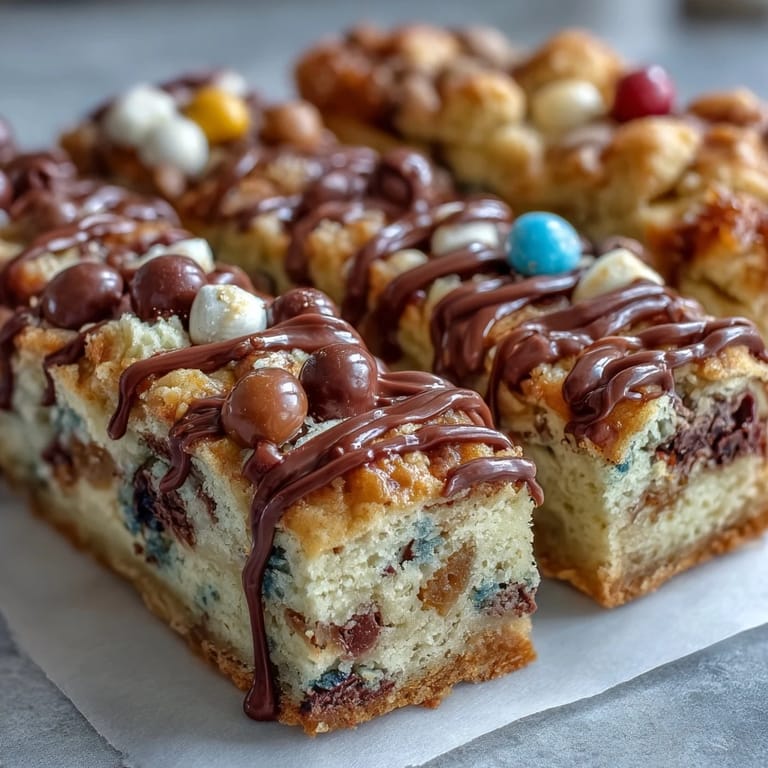
- Semi-sweet chocolate chips (1 cup) and colored candies (1/2 cup): The joy of eating these bars lives in every chocolate pocket; choose colors that match your celebration for maximum visual impact.
- White chocolate (4 oz) and vegetable oil (1 tsp): The oil keeps the melted chocolate smooth and drizzle-able rather than seizing into grainy clumps, which I learned the hard way.
Tired of Takeout? 🥡
Get 10 meals you can make faster than delivery arrives. Seriously.
One email. No spam. Unsubscribe anytime.
Instructions
- Prepare your stage:
- Heat the oven to 350°F and line your 9x13-inch pan with parchment paper, letting it overhang the sides like you're creating escape routes for the finished bars. This five-minute setup saves you fifteen minutes of frustrated scraping later.
- Build the dry foundation:
- Whisk together flour, baking soda, and salt in a medium bowl, then set it aside like you're backstage preparing the supporting cast. Getting this done early means you can fold it in gently without thinking twice.
- Create the wet base:
- In a large bowl, whisk melted butter with both sugars until the mixture looks smooth and glossy, then add eggs and vanilla, whisking until everything is pale and combined. This is where the richness begins, and you'll notice how the mixture transforms from separated ingredients into something cohesive.
- Marry wet and dry:
- Gently fold the dry ingredients into the wet mixture using a spatula, stopping as soon as you don't see any white streaks of flour—overmixing creates tough bars and nobody wants that. The dough should come together quickly, almost surprised at how easy it was.
- Add the celebration:
- Stir in the chocolate chips and colored candies, making sure they're distributed throughout so every bite feels like a small party. This is the moment where the bars go from simply good to memorable.
- Press into the pan:
- Spread the dough evenly across your prepared pan using a spatula or the back of a spoon, getting into the corners gently. Even distribution means every bar bakes at the same rate and has the same chewy-to-crispy ratio.
- Bake with attention:
- Bake for 23 to 25 minutes, watching for the moment the edges turn light golden while the center still looks slightly underdone—this is the secret to chewiness. A toothpick inserted in the center should come out mostly clean, with just a few moist crumbs clinging to it.
- Cool with patience:
- Let the bars cool completely in the pan on a wire rack before touching them; I know it's torture but rushing this step makes them crumbly. Once they've cooled all the way, they'll hold together beautifully when you cut them.
- Melt the finishing touch:
- Microwave the white chocolate with vegetable oil in 20-second increments, stirring between each burst to prevent it from seizing into a grainy disaster. The oil is non-negotiable—it keeps everything silky smooth.
- Drizzle with intention:
- Using a spoon or piping bag, create elegant lines of white chocolate across the cooled bars, then add colored sprinkles while the chocolate is still wet so they stick. This is where your celebration colors really shine.
- Set and serve:
- Allow the drizzle to fully set before cutting into 16 squares, then lift them from the pan using the parchment paper overhang. The anticipation of waiting for it to set is when everyone gathers in your kitchen asking if it's ready yet.
 Pin it
 Two days after my nephew's party, his mom texted me a photo of him sharing the last bar with his best friend, both of them grinning like they'd discovered treasure. That moment crystallized why I love making these bars—they're more than sugar and chocolate, they're edible proof that someone believes in celebrating the big moments in life.
The Science of Chewiness
The magic formula for these bars is the combination of brown sugar's molasses content and slightly underbaking them in the center; this creates a texture that's soft and yielding rather than crisp and crumbly. I spent an embarrassing amount of time experimenting with different baking times before realizing that what felt undercooked at the 23-minute mark was actually perfect by the time cooling happened. The bars continue to set as they cool, so trusting that process is essential to getting the chewiness right.
Customizing Your Celebration
The joy of these bars is that they adapt to whatever you're celebrating—change the candies to match school colors, add sprinkles in your favorite shades, or even swap in crushed candy canes for a winter celebration version. I've made them with dark chocolate chips for a coworker's promotion, with pastel candies for a baby shower, and with rainbow everything for a pride party. The base recipe is so flexible that you can make it feel completely personal without changing a single measurement.
Storage and Longevity
These bars stay perfectly chewy for up to four days in an airtight container at room temperature, which makes them ideal for parties where you want to bake ahead without stress. I learned this by accident when I made a batch three days before my nephew's party and discovered they tasted even better after a day of flavors settling into each other. Stacking them with parchment paper between layers prevents sticking and makes grabbing one quick and easy.
- Room temperature storage in an airtight container keeps them chewy for four full days, which is longer than most baked goods last in my house.
- If you somehow have leftovers after a week, they'll still be edible but will have firmed up; briefly warming them in the microwave brings back the chewiness.
- Don't refrigerate these unless absolutely necessary, as cold temperatures accelerate the hardening process and ruins their whole vibe.
 Pin it
 Making these bars taught me that celebration desserts don't need to be complicated—they just need to be made with intention and shared with people who matter. Whether it's a graduation, a promotion, or just a Friday that deserves marking, these bars say everything words sometimes can't.
Recipe FAQs
- → What ingredients provide the chewy texture?
The combination of melted butter, brown sugar, and eggs helps create a soft and chewy texture in these bars.
- → How can I customize the colors on these bars?
Use colored candy-coated chocolates and sprinkles that match your theme or celebration colors for a personalized touch.
- → What is the best way to melt white chocolate for the drizzle?
Melt white chocolate with a bit of vegetable oil in short microwave increments, stirring until smooth to ensure an even drizzle.
- → How should these bars be stored to maintain freshness?
Store them in an airtight container at room temperature for up to four days to keep them fresh and chewy.
- → Can I substitute the chocolate chips?
Yes, dark or milk chocolate chips can be used instead of semi-sweet for different flavor variations.
- → What pan size is recommended for baking?
A 9x13-inch baking pan lined with parchment paper works best for even baking and easy removal.